Best Homemade Mac and Cheese Recipe | by Tyla
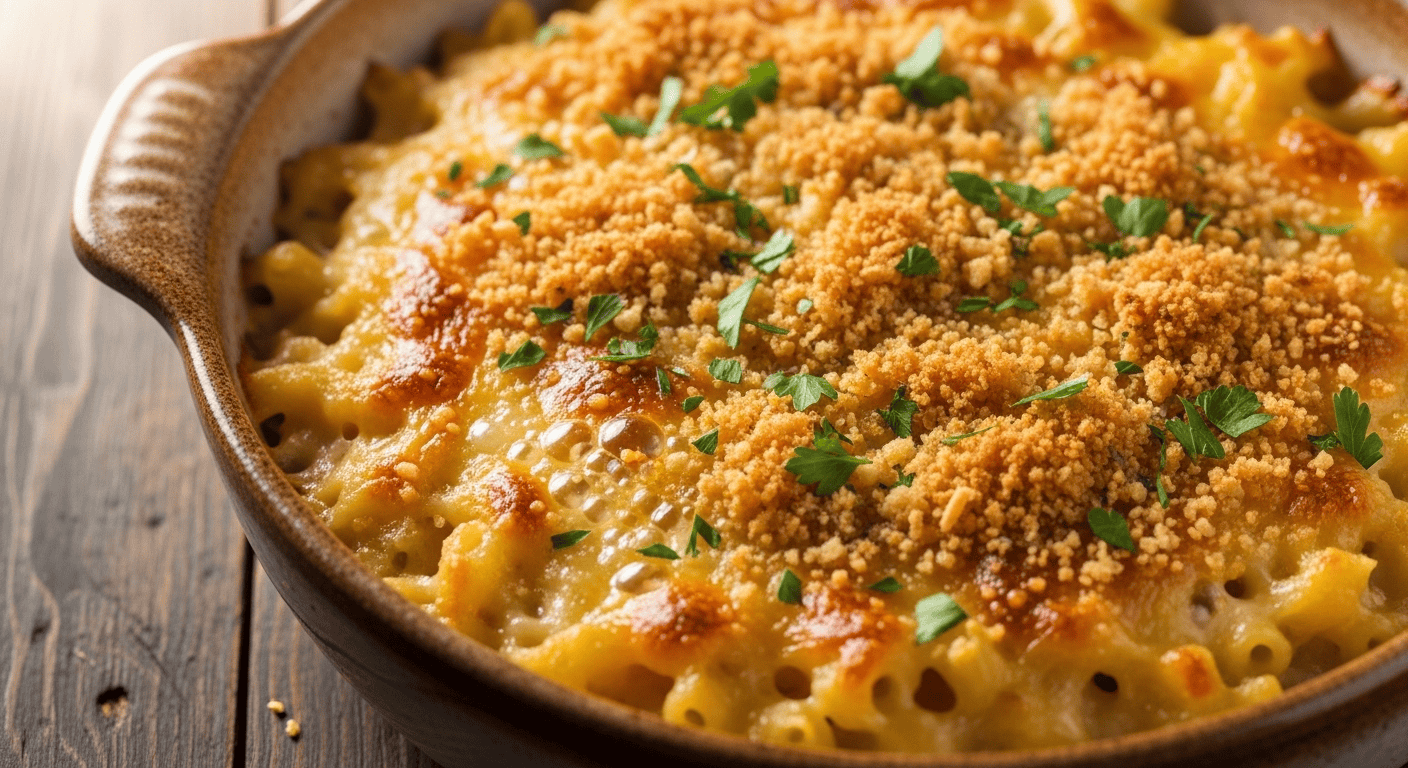
Creamy homemade mac and cheese baked to perfection. Easy recipe with rich cheese sauce and crispy topping—perfect comfort food for family dinners and gatherings.
Prep
20 min
Cook
35 min
Total
55 min
Servings
6-8 servings
Ingredients
Instructions
- 1
Preheat oven to 375°F (190°C). Lightly grease a 9×13 inch baking dish.
- 2
Bring large pot of salted water to boil. Cook elbow macaroni 1-2 minutes less than package directions until al dente. Drain well.
- 3
In large pot, melt 1/2 cup butter over medium heat. Sprinkle in 1/2 cup flour and whisk continuously for 2-3 minutes until light golden paste forms.
- 4
Gradually whisk in warmed milk and heavy cream, ensuring each addition is incorporated before adding more. Whisk until sauce thickens and coats spoon, about 5-7 minutes.
- 5
Remove pot from heat. Stir in grated cheeses a handful at a time, whisking until melted and smooth.
- 6
Add smoked paprika, dry mustard, garlic powder, salt, and pepper. Taste and adjust seasonings.
- 7
Add drained macaroni to cheese sauce and stir until thoroughly coated.
- 8
Pour mixture into prepared baking dish and spread evenly.
- 9
Combine panko, melted butter, and Parmesan. Sprinkle evenly over top.
- 10
Bake 15-20 minutes until sauce is bubbly and topping is golden brown.
- 11
Let rest 5-10 minutes before serving to allow sauce to set.
Notes
Tips for Success
- Creamy, velvety cheese sauce
- Golden, crispy breadcrumb topping
- Rich, comforting classic dish
- Perfect blend of cheeses for complex flavor
Common Mistakes to Avoid
- Can become grainy if using pre-shredded cheese
- Pasta can overcook and become mushy
- Sauce can become lumpy if milk is cold
- Can dry out if overbaked
Nutrition (per serving)
600 kcal
Calories
There’s just something magical about a really good bowl of homemade mac and cheese, isn’t there? It’s more than just pasta and cheese; it’s a warm hug in a dish, a blanket of comfort, and a surefire way to bring smiles to the table. Forget those boxed versions – today, we’re diving into how to create the absolute best, creamiest, most irresistible baked mac and cheese you’ve ever tasted, complete with a golden, bubbly top. Get ready to impress your family and friends with this timeless classic!
Table of Contents
Ingredients
Making the perfect creamy mac and cheese starts with stellar ingredients. Here’s what you’ll need:
- Elbow Macaroni: 1 pound (about 4 cups dry). While elbows are traditional, feel free to use shells, cavatappi, or even penne for a different texture.
- Unsalted Butter: 1/2 cup (1 stick). This is the base for our roux, adding richness.
- All-Purpose Flour: 1/2 cup. The thickening agent for our indulgent cheese sauce.
- Whole Milk: 4 cups, warmed. Whole milk gives the best creaminess, but 2% can work in a pinch. Warming it helps prevent lumps in your roux.
- Heavy Cream: 1 cup. For that extra luxurious, velvety texture. Trust me, it makes a difference!
- Sharp Cheddar Cheese: 4 cups, freshly grated. Sharp cheddar provides that classic, robust mac and cheese flavor. Always grate your own – pre-shredded cheeses contain anti-caking agents that can make your sauce gritty.
- Gruyere or Fontina Cheese: 2 cups, freshly grated. These cheeses melt beautifully and add a nutty, complex flavor that elevates the dish beyond basic. If you can’t find them, extra sharp cheddar or Monterey Jack are good substitutes.
- Smoked Paprika: 1 teaspoon. Adds a subtle smoky depth without being overpowering.
- Dry Mustard Powder: 1/2 teaspoon. This isn’t for mustard flavor, but rather to enhance the cheesiness. It’s a secret ingredient that brightens the cheese notes!
- Garlic Powder: 1/2 teaspoon. A touch of aromatic flavor.
- Salt: 1 teaspoon, or to taste.
- Black Pepper: 1/2 teaspoon, freshly ground, or to taste.
- Topping (Optional but Recommended):
- Panko Breadcrumbs: 1 cup. Panko gives a fantastic crisp.
- Melted Butter: 2 tablespoons. For tossing with the breadcrumbs.
- Parmesan Cheese: 1/4 cup, grated (optional, for extra flavor in the topping).
Timing
This homemade mac and cheese recipe isn’t quick like a boxed mix, but the effort is absolutely worth it.
- Prep time: 20 minutes
- This includes grating cheese (which is the most time-consuming part!), measuring ingredients, and getting your pasta water boiling.
- Cook time: 30-35 minutes (sauce & baking)
- Making the roux and cheese sauce takes about 15-20 minutes.
- Baking time for that golden, bubbly perfection is another 15-20 minutes.
- Total time: 50-55 minutes
Time-Saving Tips:
- Grate Cheese Ahead: Grate your cheeses the day before and store them in an airtight container in the fridge. This significantly cuts down on prep time.
- Mise en Place: Get all your ingredients measured and ready before you start cooking. This “everything in its place” approach makes the cooking process smooth and stress-free.
- Warming Milk: Gently warm your milk and cream in the microwave or a small saucepan while you’re making your roux. This helps it incorporate smoothly without cooling down your roux and causing lumps.
Step-by-Step Instructions
Let’s get cooking! Follow these steps closely for the best baked mac and cheese.
- Preheat & Prep Pasta: Preheat your oven to 375°F (190°C). Lightly grease a 9×13 inch baking dish. Bring a large pot of salted water to a rolling boil. Add the elbow macaroni and cook according to package directions until al dente – this is usually 1-2 minutes less than the full cooking time. Remember, it will finish cooking in the oven, so don’t overcook it! Drain well and set aside.
- Make the Roux: In a large, heavy-bottomed pot or Dutch oven, melt the 1/2 cup of unsalted butter over medium heat. Once melted, sprinkle in the 1/2 cup of all-purpose flour. Whisk continuously for 2-3 minutes until a smooth, light golden paste forms. This is your roux, the base of your rich cheese sauce. Cook it long enough to cook out the raw flour taste, but don’t let it burn.
- Build the Sauce: Gradually whisk in the warmed whole milk and heavy cream, a little at a time, ensuring each addition is fully incorporated before adding more. Continue whisking until the sauce thickens and smooths out, about 5-7 minutes. It should be thick enough to coat the back of a spoon. Reduce the heat to low.
- Add the Cheese & Seasonings: Remove the pot from the heat. This prevents the cheese from getting oily or grainy. Stir in the freshly grated sharp cheddar and Gruyere/Fontina cheeses, a handful at a time, whisking until each addition is completely melted and smooth before adding more. Add the smoked paprika, dry mustard powder, garlic powder, salt, and black pepper. Taste and adjust seasonings if necessary.
- Combine Pasta & Sauce: Add the drained, cooked macaroni to the cheese sauce. Stir gently until every piece of pasta is thoroughly coated in the luxurious sauce.
- Assemble for Baking: Pour the macaroni and cheese mixture into your prepared 9×13 inch baking dish, spreading it evenly.
- Add the Topping (Optional): In a small bowl, combine the panko breadcrumbs with 2 tablespoons of melted butter and the optional Parmesan cheese. Sprinkle this mixture evenly over the top of the mac and cheese. This creates that irresistible crispy crust!
- Bake: Bake in the preheated oven for 15-20 minutes, or until the sauce is bubbly and the topping is golden brown and crispy.
- Rest & Serve: Let the homemade mac and cheese rest for 5-10 minutes before serving. This allows the sauce to set up a bit and prevents it from being too runny.
Healthier Alternatives for the Recipe
While mac and cheese is inherently a comfort food, there are ways to lighten it up or incorporate more nutrients without sacrificing too much flavor.
- Swap Pasta: Use whole wheat pasta for added fiber and nutrients. You might find the texture slightly different, but it’s a worthwhile trade-off for health benefits. Lentil or chickpea pasta are also great gluten-free, high-protein options.
- Milk Alternatives: While whole milk provides the best creaminess, you can use 1% or 2% milk. Just be aware the sauce might be slightly less rich. Avoid skim milk, as it won’t give you the desired texture.
- Add Vegetables: Sneak in some finely grated zucchini, pureed cauliflower, or steamed, chopped broccoli into the cheese sauce. You’ll barely notice them, and they add extra vitamins. For another cheesy, vegetable-packed comfort, consider trying a creamy broccoli cheese soup!
- Lighter Cheese: Reduce the amount of high-fat cheese slightly and supplement with a bit of cottage cheese (blended into the milk for smoothness) or a low-fat sharp cheddar. You can also play with stronger-flavored cheeses like smoked gouda so you need less quantity to get a big flavor impact.
- Reduce Butter: You can reduce the butter for the roux by a tablespoon or two, but don’t eliminate it entirely, as it’s crucial for the sauce texture.
- Less Topping: Skip the butter in the breadcrumb topping and toast the panko dry, or use a smaller amount.
Serving Suggestions
This creamy homemade mac and cheese is a star on its own, but it also plays well with others!
- Classic Comfort: Pair it with a simple green salad dressed with a light vinaigrette to cut through the richness. A side of roasted asparagus or steamed green beans also works wonderfully.
- BBQ Companion: Mac and cheese is the ultimate side dish for BBQ. Think pulled pork, smoked brisket, or grilled chicken. The creamy texture perfectly complements smoky meats.
- Family Dinner: Serve it alongside meatloaf, crispy baked chicken thighs, or even a hearty vegetarian main like black bean burgers. For another hearty and cheesy pasta dish that’s a hit with the family, you might also enjoy our creamy beef bow tie pasta.
- Gourmet Additions: Elevate your mac and cheese with delicious mix-ins or toppings. Consider crumbled crispy bacon, caramelized onions, sautéed mushrooms, or even a drizzle of truffle oil just before serving.
- Presentation: Serve it straight from the baking dish for a rustic, communal feel. For individual servings, portion into small ramekins before baking for a personalized touch.
Common Mistakes to Avoid
Even seasoned cooks can stumble when it comes to mac and cheese. Here are a few pitfalls to steer clear of:
- Using Pre-Shredded Cheese: This is probably the biggest offender! Pre-shredded cheeses contain cellulose or potato starch to prevent clumping. While convenient, these additives can make your cheese sauce grainy and prevent it from melting smoothly into a luscious, velvety consistency. Always grate your own cheese for the best results.
- Overcooking the Pasta: Remember, your pasta will continue to cook in the oven. If you cook it to its full al dente stage on the stovetop, it will likely become mushy and soft after baking. Aim for a minute or two less than package directions. It should be quite firm when you drain it.
- Not Warming the Milk: Adding cold milk to a hot roux can cause the sauce to seize up and become lumpy. Gently warming the milk beforehand helps it incorporate smoothly and prevents temperature shock.
- Adding Cheese to Boiling Hot Sauce: If your sauce is still at a rolling boil when you add the cheese, the fat can separate from the solids, resulting in an oily, grainy sauce. Remove the pot from the heat or reduce it to very low before stirring in the cheese.
- Lack of Seasoning: A good cheese sauce needs more than just cheese. Don’t forget the salt, pepper, and those secret ingredients like dry mustard and smoked paprika to really make the flavors pop. Taste and adjust!
- Forgetting to Salt the Pasta Water: Just like any pasta dish, seasoning the water adds flavor to the pasta itself, which is crucial since pasta absorbs some of that saltiness.
- Not Letting it Rest: While tempting to dig in immediately, letting the mac and cheese rest for 5-10 minutes allows the sauce to thicken slightly and set, preventing a runny dish.
Storing Tips for the Recipe
Got leftovers? Lucky you! Here’s how to keep your homemade mac and cheese tasting great.
- Cool Completely: Before storing, allow the mac and cheese to cool down to room temperature. This helps prevent condensation which can lead to a watery texture.
- Refrigeration: Transfer the cooled mac and cheese to an airtight container. It will keep well in the refrigerator for 3-4 days.
- Freezing: Mac and cheese freezes surprisingly well! Once completely cooled, you can freeze it in individual portions or in a larger freezer-safe container for up to 2-3 months. Thaw overnight in the refrigerator before reheating.
- Reheating:
- Oven: This is the best method for retaining texture. Preheat oven to 300°F (150°C). Add a splash of milk or cream to the mac and cheese, cover with foil, and bake for 20-30 minutes, or until heated through. Uncover for the last 5-10 minutes if you want to crisp up the topping again.
- Stovetop: For smaller portions, add to a saucepan with a splash of milk over low heat, stirring occasionally until warmed through.
- Microwave: While quick, it can sometimes dry out the pasta. Add a tablespoon of milk, cover, and microwave in 1-minute intervals, stirring in between, until hot.
Troubleshooting Common Issues
Don’t fret if your creamy mac and cheese isn’t perfect on the first try. Here are solutions to common problems:
- My Sauce is Lumpy: This usually happens if you added cold milk to your hot roux too quickly, or didn’t whisk continuously. To fix, you can try pouring the sauce through a fine-mesh sieve or use an immersion blender to smooth it out. For future reference, always warm your milk and whisk gradually!
- My Sauce is Too Thin: If your cheese sauce isn’t thickening enough, try whisking it over low heat for a few more minutes. If it’s still too thin after adding all the cheese, you can create a small slurry of 1 tablespoon of cornstarch mixed with 1 tablespoon of cold water, then whisk it into the hot sauce and simmer for a minute or two until thickened.
- My Sauce is Too Thick: If it’s too thick, simply whisk in a splash more warm milk or cream, a tablespoon at a time, until it reaches your desired consistency.
- My Sauce is Greasy/Oily: This often occurs if you added cheese to a sauce that was too hot, causing the fats to separate. You can try to re-emulsify it by whisking vigorously off the heat, or by adding a small amount of cold milk and whisking. If it’s very oily, sometimes you can carefully skim some of the excess oil off the top. This issue is why removing the pot from heat before adding cheese is so important! For more on achieving the perfect, non-greasy sauce, you can check out this resource from The Kitchn on mac and cheese techniques.
- My Mac and Cheese is Dry After Baking: This typically means your oven was too hot, it baked for too long, or the initial sauce wasn’t quite rich enough. Next time, ensure your sauce is generously coating the pasta and consider covering with foil for most of the baking time, only uncovering at the end to crisp the topping. When reheating, always add a splash of milk.
- The Topping isn’t Crispy: Make sure you’re using Panko breadcrumbs (they’re larger and stay crisper than regular breadcrumbs) and that you’ve mixed them with a little melted butter. For extra crispiness, you can also broil the top for the last minute or two, watching it very carefully to prevent burning.
Nutritional Information per Serving
(Please note: This is an estimated nutritional breakdown. Actual values can vary based on specific brands, exact measurements, and substitutions.)
- Calories: Approximately 550-650 kcal
- Protein: 25-30g
- Carbohydrates: 45-55g
- Fat: 35-45g
- Saturated Fat: 20-25g
- Fiber: 2-3g
- Cholesterol: 100-120mg
- Sodium: 700-850mg
- Key Nutrients: Excellent source of Calcium, Vitamin D (from dairy), and Protein.
FAQ
Q: Can I make this homemade mac and cheese ahead of time?
A: Yes, you can! You can assemble the entire dish, including the topping, and refrigerate it for up to 24 hours before baking. When ready to bake, let it sit at room temperature for about 30 minutes while your oven preheats, then bake as directed, adding an extra 10-15 minutes to the baking time since it will be starting cold. You might want to cover it with foil for the first part of baking to prevent it from drying out.
Q: What are the best cheeses for creamy mac and cheese?
A: For the ultimate flavor and texture, a blend is key! Sharp cheddar is non-negotiable for classic flavor. Good melting cheeses like Gruyere, Fontina, Monterey Jack, Colby, or even a mild white cheddar work beautifully for creaminess and nutty notes. Avoid very soft or very hard cheeses like fresh mozzarella (too watery) or Parmesan as the sole cheese (doesn’t melt as well for a creamy sauce). For an extra cheesy and budget-friendly option, this recipe from Budget Bytes on extra cheesy mac and cheese also provides great insights into cheese selection.
Q: My baked mac and cheese came out a bit dry. What happened?
A: A common culprit is overbaking or using too little sauce. Ensure your pasta is slightly undercooked initially, and that your sauce is generous enough to fully coat every noodle. Covering the dish with foil for most of the baking time, uncovering only for the last 10 minutes to crisp the topping, can also help retain moisture. If it’s a bit dry after baking, stir in a tablespoon or two of warm milk or cream before serving.
Q: Is there a gluten-free option for this recipe?
A: Absolutely! Simply swap out the elbow macaroni for your favorite gluten-free pasta (ensure it’s a sturdy shape that holds up well, like GF elbows or shells). For the roux, you can use a gluten-free all-purpose flour blend (one specifically designed for sauces works best) or even cornstarch. If using cornstarch, make a slurry with cold milk and whisk it into the hot milk/cream mixture to thicken, rather than making a traditional roux with butter and flour.
Q: Can I add meat to this recipe?
A: Yes, adding meat is a fantastic way to make this a heartier meal! Cooked and crumbled bacon, shredded smoked chicken, diced ham, or even ground beef (browned and seasoned) are delicious additions. Stir them into the mac and cheese mixture right before transferring it to the baking dish. If you’re looking for another classic baked mac and cheese recipe for comparison or inspiration, this Baked Homemade Macaroni and Cheese recipe from AllRecipes often features variations with meat or different cheeses.
Conclusion
And there you have it – the ultimate recipe for homemade mac and cheese that’s guaranteed to be a hit every single time. This dish is truly a labor of love, but the rich, creamy sauce, perfectly cooked pasta, and crispy, golden topping are rewards well worth the effort. It’s the kind of comfort food that evokes happy memories and creates new ones, making every gathering feel a little more special. So go ahead, whip up a batch, gather your loved ones, and savor every indulgent bite. You can also bookmark this page, or find the full printable version of this homemade mac and cheese recipe here for your convenience! Don’t forget to leave a rating and share your thoughts in the comments below, or snap a pic and tag us on social media – we’d love to see your delicious creations! Happy cooking!
Why This Mac and Cheese Works
A bechamel base (butter, flour, milk) is what gives homemade mac and cheese its creamy, stable texture — it prevents the cheese proteins from clumping and seizing when they hit heat. The flour and butter must cook together for at least 2 minutes before the milk goes in, or the finished sauce will taste of raw flour. Add the cheese off the heat: high heat causes the proteins in cheese to tighten and squeeze out the fat, resulting in a greasy, grainy sauce. Use freshly grated cheese rather than pre-shredded — pre-shredded is coated in anti-caking agents that interfere with smooth melting and result in a gritty texture.