Easy Grilled Cheese Sandwich — Crispy, Cheesy Perfection
Make an easy grilled cheese sandwich that's crispy and melty—learn tips for a perfect grilled cheese. Quick, cheesy comfort food for busy weeknights. Fast.
Prep
7 min
Cook
8 min
Total
15 min
Servings
2 servings
Ingredients
Instructions
- 1
Lay out bread slices and generously spread softened butter or mayonnaise on one side of each slice, going all the way to the edges.
- 2
For extra flavor, sprinkle a tiny pinch of flaky sea salt or garlic powder onto the buttered side.
- 3
Have cheese sliced or grated and at room temperature for better melting.
- 4
Flip two buttered slices butter-side down and layer cheese evenly on these slices.
- 5
Place remaining two bread slices on top, butter-side up, to create two ready-to-grill sandwiches.
- 6
Place a non-stick skillet or cast-iron pan over medium-low to medium heat.
- 7
Carefully place assembled sandwiches into the warm pan and cook for 3-4 minutes until bottom is golden brown.
- 8
Using a wide spatula, gently flip each sandwich and cook for another 3-4 minutes until second side is golden brown and cheese is fully melted.
- 9
Remove sandwiches from pan and slice each in half diagonally.
- 10
Serve immediately while hot and crispy.
Notes
Tips for Success
- Golden, crispy exterior
- Warm, gooey, melty center
- Nostalgic comfort food
- Quick and easy to make
- Versatile with different cheese blends
Common Mistakes to Avoid
- Bread can burn easily if heat is too high
- Cheese may not melt properly if too cold
- Can become soggy if not cooked properly
- Can be greasy if too much butter is used
- Sandwich can fall apart if overstuffed
Nutrition (per serving)
350-450 kcal
Calories
Introduction
There are some meals that just whisper “home” and “happiness,” and for many of us, that’s the humble yet mighty grilled cheese sandwich. It’s a nostalgic hug in food form, a golden, crispy exterior giving way to a warm, gooey, melty center. But while it seems simple, mastering the truly easy grilled cheese sandwich—one that’s perfectly golden brown, consistently cheesy, and never soggy—is an art. Forget everything you thought you knew about tossing bread and cheese into a pan. We’re about to unlock the secrets to a grilled cheese experience so good, it’ll make you wonder how you ever settled for less.
Table of Contents
Ready to transform your lunch or dinner routine with a dish that’s both incredibly straightforward and profoundly satisfying? This guide is packed with all the insider knowledge you need to achieve grilled cheese greatness, every single time. From selecting the perfect cheese and bread to mastering the sizzle, we’ll cover everything that goes into creating that coveted, perfect grilled cheese. Get ready to elevate your comfort food game and learn how to whip up the ultimate snack, meal, or late-night craving fulfillment with minimal fuss and maximum flavor.
Ingredients
Creating an extraordinary grilled cheese starts with choosing the right components. While the basic concept is simple, the quality and type of your ingredients can make all the difference between a good sandwich and a truly memorable one. Here’s what you’ll need for two fantastic sandwiches:
- Bread (4 slices): This is the foundation!
- Our top recommendation: A good quality, medium-density white or sourdough bread. Look for something that’s sturdy enough to hold up to the cheese and butter but not too thick that it prevents even melting. Brioche can be wonderful for a richer flavor, or a hearty whole wheat for a nuttier taste. Avoid very thin, flimsy sandwich bread or extremely crusty artisanal loaves.
- Why it matters: The right bread provides structure, flavor, and ensures a crisp, golden exterior.
- Cheese (4-6 slices or about 4-6 oz grated): The gooey heart of your sandwich.
- Our top recommendation: A blend of cheeses for the best flavor and melt.
- For melt: American (yes, really!), mild cheddar, Monterey Jack, fontina, or Gruyère. These melt smoothly and stretch beautifully.
- For flavor: Sharp cheddar, provolone, Swiss, or a touch of Parmesan (use sparingly).
- Pro Tip: Use cold, pre-sliced cheese or grate your own for faster melting. Don’t be shy with the cheese—aim for generous layers, but don’t overstuff it so much that it oozes out completely.
- Why it matters: The cheese provides the essential creaminess and flavor. Blending ensures both amazing melt and complex taste.
- Our top recommendation: A blend of cheeses for the best flavor and melt.
- Fat (2-4 tablespoons): This is what browns the bread and adds incredible flavor.
- Our top recommendation: Unsalted butter. It browns beautifully and adds a rich, savory depth. Spread it evenly from edge to edge!
- Alternative: Mayonnaise (yes, mayo!). Spreading a thin layer of mayo on the outside of the bread instead of butter creates an incredibly golden, crispy crust and a subtle tangy flavor. Try it – you might be surprised!
- Why it matters: The fat is crucial for achieving that signature golden, crispy crust and preventing the bread from drying out.
- Optional Enhancements:
- Salt and Pepper: A tiny pinch of flaky sea salt on the buttered exterior can enhance the crispiness and flavor. Freshly ground black pepper inside can add a subtle kick.
- Garlic Powder/Onion Powder: A sprinkle on the buttered side before grilling for an extra savory note.
- Herbs: A pinch of dried thyme or oregano can elevate the flavor profile.
[INGREDIETNSIMAGESHORTCODE]
Timing
One of the greatest joys of an easy grilled cheese sandwich is how quickly it comes together, making it the ultimate cheesy comfort food for busy days or unexpected cravings.
- Prep Time: 5-7 minutes
- This includes gathering your ingredients, slicing cheese (if not pre-sliced), and spreading butter or mayonnaise on the bread.
- Cook Time: 6-8 minutes
- This is the time it takes to get that perfect golden-brown crust and a thoroughly melted interior. Each side usually takes 3-4 minutes.
- Total Time: 11-15 minutes
- From start to finish, you can have a perfect, piping hot grilled cheese ready to devour in under 15 minutes. It truly is one of the fastest satisfying meals you can make!
Time-Saving Tips:
- Pre-slice your cheese: If you frequently make grilled cheese, pre-slice or pre-grate your preferred cheese blend and store it in an airtight container in the fridge.
- Use a griddle: If making multiple sandwiches, a large electric griddle allows you to cook several at once, saving time.
- Have your accompaniments ready: If you’re serving with tomato soup, have it warming up while you make your sandwich so everything is ready at the same time.
Step-by-Step Instructions
Ready to make the perfect grilled cheese? Follow these simple steps for a sandwich that’s crispy on the outside, melty on the inside, and pure joy with every bite. The secret is low-to-medium heat and patience!
- Prepare Your Bread: Lay out your bread slices on a clean surface. Generously spread softened butter or mayonnaise on one side of each slice, going all the way to the edges. This is the “outside” of your sandwich that will hit the pan. For an extra touch of flavor, you can sprinkle a tiny pinch of flaky sea salt or garlic powder onto the buttered side.
- Assemble the Sandwich: Flip two of the buttered slices butter-side down. Layer your cheese on these slices. Be generous, but don’t overstuff. If using multiple types of cheese, layer them evenly. Place the remaining two bread slices on top, butter-side up. You now have two ready-to-grill sandwiches.
- Heat Your Pan: Place a non-stick skillet or cast-iron pan over medium-low to medium heat. The key here is not too hot. We want a gradual browning of the bread and a slow, even melt of the cheese. A good way to test if it’s ready is to flick a tiny bit of water into the pan – if it sizzles and evaporates quickly, it’s ready.
- Grill the First Side: Carefully place your assembled sandwiches into the warm pan. Cook for about 3-4 minutes. Resist the urge to press down on the sandwich during this time. Let the heat do its work. You’ll know it’s ready to flip when the bottom is beautifully golden brown and crispy, and you might see a tiny bit of cheese starting to soften or peek out.
- Flip and Grill the Second Side: Using a wide spatula, gently flip each sandwich. Cook for another 3-4 minutes on the second side. Again, avoid pressing down. While the second side cooks, the cheese inside will continue to melt and become wonderfully gooey.
- Check for Perfection: Once both sides are golden brown and the cheese is fully melted and ooey-gooey, your easy grilled cheese sandwich is done!
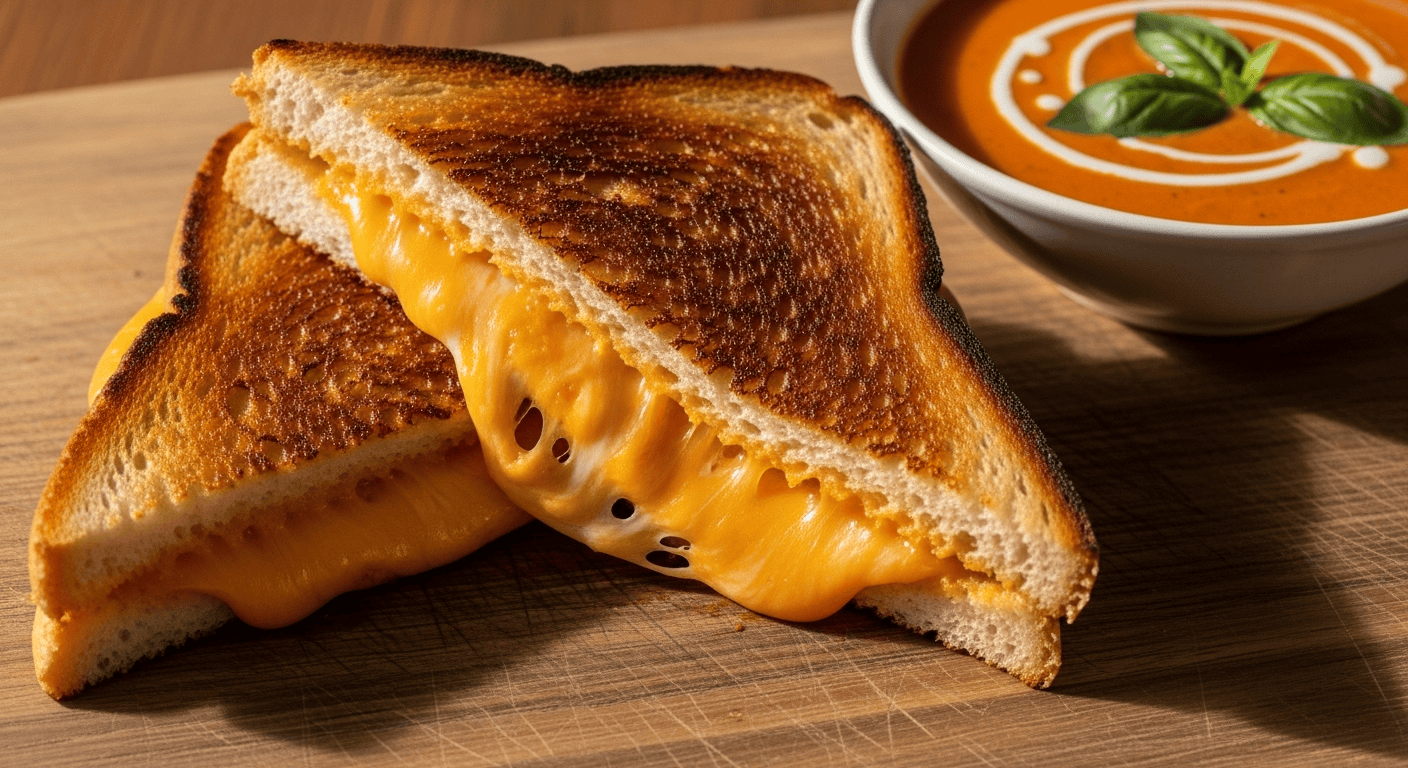
- Serve Immediately: Carefully remove the sandwiches from the pan. For best results and easier eating, slice each sandwich in half diagonally. This also helps reveal that irresistible cheesy pull! Serve piping hot and enjoy!
Healthier Alternatives for the Recipe
While a classic grilled cheese is pure indulgence, you can certainly tweak the recipe to be a little lighter without sacrificing too much of that cheesy comfort food appeal.
- Bread Choice:
- Swap: Whole-wheat, whole-grain, or sprouted grain bread instead of white bread. These options offer more fiber, vitamins, and minerals.
- Benefit: Increased satiety and nutritional value.
- Cheese Selection:
- Swap: Opt for lower-fat cheese varieties. Swiss, provolone, or Monterey Jack often come in reduced-fat versions that still melt well. You can also use stronger-flavored cheeses like sharp cheddar, which allows you to use less cheese overall for the same flavor impact.
- Benefit: Reduced saturated fat and calorie content.
- Fat for Grilling:
- Swap: Instead of a thick layer of butter, use a light spray of olive oil or avocado oil. You can also use a very thin layer of heart-healthy mayonnaise.
- Benefit: Lower in saturated fat and calories, while still achieving a crispy crust.
- Add Veggies!
- Addition: While it won’t be a classic grilled cheese, adding thinly sliced tomatoes, spinach, caramelized onions, sautéed mushrooms, or roasted red peppers inside the sandwich can boost nutrients and flavor. Cook heartier veggies like onions or mushrooms first.
- Benefit: Adds fiber, vitamins, and minerals, making the sandwich more substantial and balanced.
- Portion Control:
- Modification: Sometimes, a half-sandwich with a side salad or a bowl of broth-based soup is just as satisfying as a whole one.
- Benefit: Reduces overall calorie and fat intake.
By making one or two of these simple swaps, you can enjoy a delicious grilled cheese that aligns better with your dietary goals.
Serving Suggestions
The easy grilled cheese sandwich is a versatile dish that pairs wonderfully with a variety of sides, elevating it from a simple snack to a satisfying meal. Here are some of our favorite ways to serve it:
- The Classic Pairing: Tomato Soup
- This is the quintessential duo for a reason! The creamy, tangy warmth of tomato soup is the perfect contrast to the rich, salty grilled cheese. It’s the ultimate cheesy comfort food experience.
- Presentation Tip: Serve the soup in a mug for easy dipping, or in a bowl alongside a half-sandwich for a heartier meal.
- Fresh and Crunchy Sides:
- Dill Pickles: The brininess and crunch of a good dill pickle cut through the richness of the cheese beautifully. Serve spears or slices on the side.
- Potato Chips: A simple, nostalgic side that adds a satisfying crunch. Choose your favorite flavor – classic salted, salt and vinegar, or even a smoky BBQ chip.
- Coleslaw: A creamy or vinaigrette-based coleslaw offers a refreshing counterpoint.
- Green Goodness:
- Side Salad: A simple mixed green salad with a light vinaigrette is a fantastic way to add freshness and balance to the meal. Think spring mix, cherry tomatoes, and cucumber.
- Roasted Vegetables: If you want something warm and savory, roasted broccoli, asparagus, or bell peppers make a lovely addition.
- Flavorful Dips & Sauces (for the adventurous!):
- Ketchup: A timeless favorite, especially if you like a little tang.
- Mustard: A good Dijon or spicy brown mustard can add a sophisticated kick.
- Sriracha Mayo: For those who like a little heat and creaminess.
- Balsamic Glaze: A drizzle can add a sweet and tangy element, especially if you have tomato or basil in your sandwich.
No matter how you choose to serve it, remember that presentation matters! A diagonally cut sandwich always looks more appealing and is easier to eat, revealing that enticing, melted cheese.
Common Mistakes to Avoid
Even an easy grilled cheese sandwich can go wrong if you’re not careful. Avoiding these common pitfalls will ensure your sandwich is always a perfect grilled cheese masterpiece.
- Mistake #1: Heat Too High
- Problem: If your pan is too hot, the bread will burn on the outside before the cheese has a chance to fully melt inside. You’ll end up with a charred crust and cold, unmelted cheese – a tragic outcome!
- Solution: Always use medium-low to medium heat. Patience is key. This allows the bread to gradually toast to a beautiful golden brown while the cheese gently softens and melts to gooey perfection.
- Mistake #2: Not Enough Fat (Butter/Mayo)
- Problem: Skimping on the butter or mayonnaise means you won’t get that even, crispy, golden crust. The bread might dry out or stick to the pan.
- Solution: Be generous! Spread a good, even layer of softened butter or mayonnaise from edge to edge on the outside of each bread slice. This ensures consistent browning and adds incredible flavor.
- Mistake #3: Pressing Down Too Hard
- Problem: While a gentle press with your spatula is fine, flattening your sandwich aggressively can squeeze out the precious cheese, making it greasy and thin. It also compacts the bread, making it dense instead of fluffy and crisp.
- Solution: Let gravity and heat do most of the work. A light press is okay, but avoid heavy mashing. The goal is even contact with the pan, not squishing.
- Mistake #4: Wrong Cheese Choice
- Problem: Using cheeses that don’t melt well (like fresh mozzarella, feta, or goat cheese on their own) or are too dry will result in a less-than-gooey center.
- Solution: Stick to good melting cheeses like American, cheddar (mild to sharp), Monterey Jack, fontina, or Gruyère. A blend often gives the best flavor and melt.
- Mistake #5: Flipping Too Soon (or Too Late)
- Problem: Flipping too early means the bread isn’t golden, and the cheese hasn’t started melting. Flipping too late risks burning the bread.
- Solution: Wait until the first side is a deep golden brown and you see the edges of the cheese starting to soften or melt slightly, usually 3-4 minutes. Use a wide spatula for a confident flip.
- Mistake #6: Using Cold Cheese Directly from the Fridge (without proper layering)
- Problem: Very thick, cold slices of cheese will take longer to melt, potentially leading to burnt bread if you try to melt it completely.
- Solution: If using thicker slices, let them come to room temperature for 10-15 minutes before assembling. Or, use thinner slices or grated cheese, which melt much faster and more evenly. For expert tips on making the ultimate grilled cheese, you can check out resources like Serious Eats for in-depth guidance on cheese selection and cooking techniques.
By being mindful of these common errors, you’re well on your way to grilled cheese perfection every single time.
Storing Tips for the Recipe
A fresh, hot grilled cheese sandwich is truly a thing of beauty. However, sometimes you might have leftovers, or you might be looking for ways to streamline your cooking. Here’s how to best handle storing and reheating:
- Best Eaten Fresh:
- The truth is, a grilled cheese sandwich is at its absolute peak straight from the pan. The bread is crispy, and the cheese is molten and stretchy. As it cools, the bread loses its crispness and the cheese solidifies.
- Storing Leftovers (Not Ideal, but Possible):
- If you must store a leftover grilled cheese, allow it to cool completely to room temperature. This prevents condensation which can make the sandwich soggy.
- Wrap it tightly in plastic wrap or aluminum foil, or place it in an airtight container.
- Store in the refrigerator for up to 1-2 days. Beyond that, the quality diminishes significantly.
- Reheating (for Best Results):
- Skillet/Panini Press (Recommended): This is the best method to revive some of that crispy texture.
- Place the cold sandwich in a dry, non-stick skillet over medium-low heat.
- Cover the pan with a lid for a minute or two to allow the cheese to soften and melt from the steam.
- Remove the lid and continue cooking, flipping occasionally, until the bread is crispy and golden again, and the cheese is fully melted. This usually takes 5-7 minutes.
- Toaster Oven: A toaster oven can also work well, heating the sandwich more evenly than a microwave.
- Place the sandwich directly on the rack (or on foil if you want to avoid drips) and heat at 350°F (175°C) for 5-10 minutes, or until heated through and crispy.
- Oven: Similar to a toaster oven, but for larger batches.
- Preheat oven to 350°F (175°C). Place sandwiches on a baking sheet and heat for 10-15 minutes, flipping halfway, until crispy and heated through.
- Microwave (Least Recommended): While quick, the microwave will make the bread soggy and chewy, and the cheese might become rubbery. Only use this if you prioritize speed over texture. Heat in 15-30 second intervals until cheese is melted.
- Skillet/Panini Press (Recommended): This is the best method to revive some of that crispy texture.
- Freezing:
- We do not recommend freezing a fully assembled and cooked grilled cheese sandwich. The texture of both the bread and cheese will suffer greatly upon thawing and reheating.
- Prepping Components:
- Instead of freezing cooked sandwiches, you can prep components ahead of time. Slice your bread, pre-slice or grate your cheese, and have your butter or mayo ready. This drastically cuts down on the already short prep time for an easy grilled cheese sandwich.
Troubleshooting Common Issues
Even with an easy grilled cheese sandwich, sometimes things don’t go exactly as planned. Here are solutions to common problems you might encounter:
- Issue #1: Soggy or Greasy Sandwich
- Cause: Too much butter/oil, pan heat too low for too long, or pressing down too hard. Also, if the sandwich cools on a flat surface without airflow.
- Solution: Use just enough fat to coat the bread evenly, not saturate it. Ensure medium-low to medium heat to allow for crisping. Avoid aggressive pressing. Once cooked, transfer to a wire rack for a minute before serving to allow steam to escape and maintain crispness.
- Issue #2: Cheese Not Fully Melted
- Cause: Pan heat too high (bread burns before cheese melts), cheese too cold/thick, or not enough cooking time.
- Solution: Lower the heat to medium-low. This gives the cheese more time to melt. Use cheese that’s closer to room temperature, or choose thinner slices/grated cheese for faster melting. Cover the pan with a lid for the first 1-2 minutes of cooking on each side – the trapped steam will help melt the cheese without burning the bread.
- Issue #3: Burnt Bread, Undermelted Cheese
- Cause: Pan heat definitely too high. This is the most common mistake!
- Solution: Immediately reduce heat. Next time, start with medium-low and be patient. It should take 3-4 minutes per side to achieve golden-brown perfection, not 1-2 minutes.
- Issue #4: Bread Sticks to the Pan
- Cause: Not enough fat, or a non-stick pan that isn’t truly non-stick anymore.
- Solution: Ensure a generous, even coating of butter or mayo on the outside of the bread. If using a well-seasoned cast iron, make sure it’s properly oiled. If your non-stick pan is losing its coating, it might be time for a new one, or try using a bit more fat.
- Issue #5: Sandwich Falls Apart When Flipping
- Cause: Overstuffed with cheese, or not letting the first side cook long enough to form a sturdy crust.
- Solution: Don’t overdo the cheese! A good amount is 2-3 slices per side, or a moderate layer of grated cheese. Wait until the first side is truly golden and firm before attempting to flip. Use a wide, sturdy spatula for support.
- Issue #6: Lack of Flavor
- Cause: Using bland bread or cheese, or not seasoning.
- Solution: Upgrade your ingredients! Use a good quality sourdough or brioche bread. Blend cheeses for more complex flavor (e.g., sharp cheddar with Monterey Jack). Consider adding a pinch of salt to the buttered exterior, or a thin spread of mustard or a sprinkle of garlic powder on the inside of the bread before adding cheese.
By addressing these common issues, you’ll be well on your way to consistently creating a perfect grilled cheese that’s both delicious and beautiful.
Nutritional Information per Serving
Please note: This is an estimated nutritional breakdown for one classic grilled cheese sandwich (2 slices of bread, 2-3 slices of cheddar cheese, 1 tablespoon of butter). Actual values will vary significantly based on specific ingredients, brands, and portion sizes.
- Calories: 350-450 kcal
- Protein: 15-20g
- Carbohydrates: 25-35g
- Fiber: 1-3g
- Sugars: 2-4g
- Fat: 20-30g
- Saturated Fat: 10-18g
- Cholesterol: 40-60mg
- Sodium: 400-600mg
- Calcium: 20-30% DV (Daily Value)
- Vitamin A: 10-15% DV
This estimate assumes a standard serving size. Choosing whole-grain bread, leaner cheese, or less butter can help reduce calorie and fat content, making it a more balanced option.
FAQ
What’s the best type of cheese for an easy grilled cheese sandwich?
The “best” cheese is subjective, but for an ideal melt and flavor, we recommend a blend! Good melting cheeses include American (for ultimate melt), Monterey Jack, Fontina, Gruyère, and mild to medium cheddar. For more complex flavor, add a slice of sharp cheddar or provolone. A combination of a great melting cheese and a great tasting cheese offers the best of both worlds, ensuring your sandwich is truly a perfect grilled cheese.
Should I use butter or mayonnaise on the outside of the bread?
This is a hot debate among grilled cheese enthusiasts!
- Butter provides a classic rich flavor and a golden-brown crust. Ensure it’s softened and spread evenly.
- Mayonnaise (on the outside of the bread, not inside!) creates an incredibly crispy, deeply golden crust with a subtle tangy flavor. Many find it easier to spread evenly than butter.
Both work wonderfully, so it comes down to personal preference. Try both to see which you prefer for your ultimate cheesy comfort food.
How can I make my grilled cheese extra crispy?
To achieve maximum crispiness, follow these tips:
- Low to Medium-Low Heat: This is crucial. It allows the bread to gradually toast and dry out slightly, leading to a crispier texture.
- Even Fat Coverage: Spread butter or mayonnaise from edge to edge on the outside of the bread. This ensures consistent browning.
- Use a Heavy-Bottomed Pan: Cast iron or a good quality non-stick pan ensures even heat distribution, preventing hot spots and promoting uniform crisping.
- Avoid Over-Pressing: Don’t flatten the sandwich aggressively; a light, even pressure is fine to ensure good contact with the pan.
- Serve Immediately: Grilled cheese is at its crispiest right after cooking.
Can I prepare grilled cheese sandwiches ahead of time?
While grilled cheese is best enjoyed fresh from the pan, you can do some prep work to make it even faster. You can pre-slice your cheese and bread. You can even assemble the sandwiches (with cheese between the bread) and then wrap them individually in plastic wrap, refrigerating them for a few hours. However, do not butter them until just before grilling, as the buttered bread will become soggy. For the truly perfect grilled cheese, grilling just before eating is always recommended.
What kind of bread is best for grilled cheese?
A good quality, medium-density bread is ideal. White bread, sourdough, brioche, or even a good whole wheat bread work wonderfully. The key is to choose bread that is sturdy enough to hold the cheese without falling apart, but not so thick or crusty that it interferes with the melt or becomes difficult to eat. Avoid very flimsy, thin sandwich breads, as they can get soggy quickly.
There you have it – everything you need to know to create the most incredible easy grilled cheese sandwich every single time! Whether you’re making a quick lunch, a comforting dinner, or just satisfying a craving for some serious cheesy comfort food, this recipe will guide you to perfection. So grab your pan, your favorite cheese, and get ready to enjoy a golden, gooey masterpiece.
We’d love to hear how your grilled cheese turned out! Did you try a new cheese blend? Discover a secret to extra crispiness? Share your creations and thoughts in the comments below, or better yet, snap a photo and share it on Pinterest with your friends! Happy grilling!